
 Well, gardening is definitely in the air, isn't it! When we went to town earlier this week for our bi-monthly shopping, virtually every store we went to was displaying gardening supplies of one kind or another: tools, gloves, soil, seeds, plants, you name it!
While everybody else is getting their hands and knees dirty, sadly we won't be joining in the fun. The land on which we live is surrounded by tall trees so 'no can do' for an outdoor garden. (Sigh) Actually, right now I'm kinda glad I don't have to take on gardening; not sure where I'd manage to fit that into my busy schedule these days, what with our new major project in the works and all.
I may not be blessed with the greenest of thumbs and a sunny garden spot, but I've been keeping a little kitchen garden of my own for years, regardless of the season.
Kitchen Harvest
I discovered sprouting early on when I became vegetarian. Although I did dabble a little into home-grown beans, sunflower and buckwheat sprouts, my specialty has always been small 'leafy' varieties, such as alfalfa or clover. The very first vegetarian book I bought was written by a well-known figure on the Quebec veggie scene; Renee Frappier. Amongst the many things I learned from her is a very simple sprouting trick I've been using successfully for years. I haven't seen it mentioned anywhere else, so I thought I'd pass it along to you guys. (Here I am, giving away all my secrets again! lol)
4 Steps To Successful Sprouting
Don't know whether you've ever tried your hand at sprouting, but not to take any chances, I'll walk you through the process I use. (Those of you who are experienced sprouters will recognize it as the 'Jar Method' with an added twist.)
What You Need
So first, let's have a look at what equipment you'll need to have on hand:
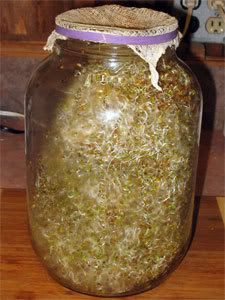
- A wide-mouth glass jar (canning jars work great!) For my part, I use a big gallon jar, as I prefer to make a huge batch and be set for a while rather than have a constant ongoing sprouting operation.
- Some kind of screen type lid to cover the jar. You can easily make one by cutting a piece of cotton cheesecloth or some kind of mesh, held in place with an elastic band. Most health food stores also sell plastic screen lids especially designed for sprouting that will fit on top of the wide-mouth jars.
- A large plastic bowl
- A cup, fork, and spoon
- 1 or 2 round or rectangular plastic trays such as those used for germinating seeds
- 1 or 2 pieces of plastic to cover the trays
- A spray bottle
- Oh, and I almost forgot! A few tbs. of sprouting seeds such as alfalfa, clover, radish, or sprouting mix packages you can find in HFS
Alright, now that we've got our equipment, let's get a-sprouting!
Step 1 - Soaking
The first thing you want to do is soak your seeds in fresh water for 8 to 12 hours to rehydrate them and initiate the sprouting process. (I usually put them to soak before going to bed and leave them overnight.) The amount of seeds you use depends on what yield you're looking for and the size of your jar. I use 4 tbs of seeds to fill up a gallon jar so I guess you'd need roughly 1 tbs per quart jar.
Step 2 - Rinsing
Once the soaking period is over, drain the soak water well, then give the seeds a good rinse. (I usually swirl the jar around for a few seconds.) It is key that you thoroughly drain the water, as it may otherwise cause your sprouts to rot. (Yuck!) For that purpose, tip the jar over at a 45 degree angle for at least a few minutes (a dish drying rack works well for this or you can just use your sink). Once the water is fully drained, leave the jar in a standing position on an out-of-the-way corner of your counter.
Some sources say that it doesn't matter whether you leave the sprouts exposed to light or not. Personally, I've found that my sprouts do better if I recreate a 'natural environment', so I start them out in the dark, by covering the jar with a towel.
Continue to rinse your sprouts with fresh water twice a day, for 3 to 5 days, being careful to drain them well to avoid spoilage. Length of sprouting time varies depending on how warm you keep your kitchen. (I've found that they generally do better in the cool.)
When the sprouts are a little over an inch long, take the towel off and continue the rinsing process for an extra day.
OK, this is all pretty basic, mainstream stuff so far. But here's where it gets interesting and differs from most sprouting techniques...
Step 3 - The Bath
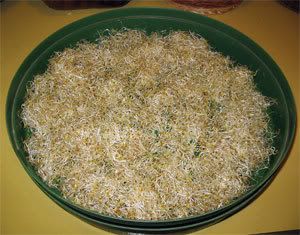
Sometime by the 4th to 6 th day, your sprouts should be about one and 1/2 inch long and your jar nearly full:
Time to give these little guys a bath!
Fill up a large plastic bowl with fresh water. Take the lid off the jar and transfer the sprouts over to the water by gently loosening them up with a fork. (If you're doing a large quantity, you may need to do this in 2 or 3 batches.)
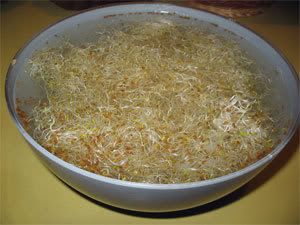 Then carefully separate the sprouts with the fork, since they've all gotten entangled in the sprouting process, and stir them around in the water. This will cause the hulls to loosen up and come to the surface. With a spoon, bring these over to one side of the bowl (see photo below) and scoop them out into a cup. This step is important, as it will make your sprouts more easily digestible. Plus, your sprouts look so much more appetizing without a bunch of little brown hulls.
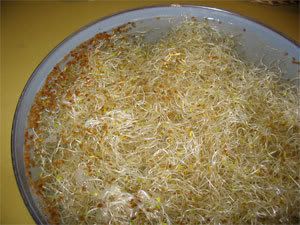
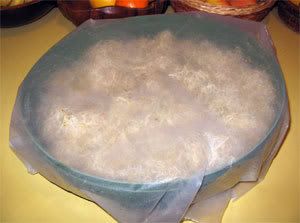
Once that's done, transfer the sprouts over to a large tray with the fork. I use a couple of big plant trays inserted in one another. If you look closely at the next picture, you'll see that Don has pierced a few holes in the top tray to allow for drainage.
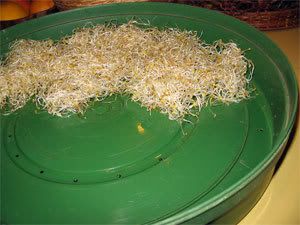
Alternatively, you could use rectangular gardening trays that are being sold for starting seeds from scratch. Once the tray is full, tip it over a little to one side so as to help drain some of the excess water.
Lastly, cover the trays with a piece of plastic (germination trays come with a clear plastic top which is perfect for this), making sure it's airtight. You don't want the sprouts to be exposed to air, as it will cause them to dry out.
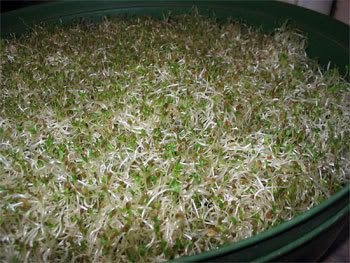
Step 4 - Greening
Leave your freshly bathed sprouts close to a window, but not in direct sunlight, to allow chlorophyll to develop. When they're all nice and green (which can take one or two days), the sprouts are ready for harvesting. (If it takes more than one day, you might want to check on them to make sure they're not dry. In which case, just spray them with a little water.)
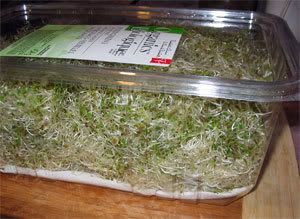
Finally, store your crispy fresh kitchen harvest into a sealed container or plastic bag. I like to use those 'Spring Mixed Greens' containers with some paper towel which I lay on the bottom to absorb excess moisture. I get to fill one and a half of those with the yield of one gallon jar, and we're stocked up in sprouts for a couple of weeks.
That's it! You're all done!
I know this may seem like a lot of work, but really it isn't. The whole bathing process only takes me 10 minutes or so and, believe me, is well worth the extra effort. Once you get to enjoy your very own beautiful home-grown sprouts, you'll no longer be able to settle for the store-bought variety!
As for the total sprouting period, I find that it can take from 6 to 8 days, depending on the season and how warm it is in our home.
Want To Know More?
For additional information as to the health benefits of sprouts and how to sprout other kinds of seeds/beans, you may want to have a look at the following sources:
Karen Knowler has also published an excellent article on the 'how to' of sprouting in a recent newsletter. It's still not available on her site yet, but fellow blogger, Raw Vegan Mama has posted it on her 'Journey to Raw'.
Happy year-round indoor gardening!
*~*~*~*
Photo Credits:
gardening tools by mysparetimedesign
Technorati Tags:


wow, this is great! thank you so much for the detailed sprouting instructions with the storage part. love it. have to get involved with sprouting again. when i buy the sprouts, i usually end up throwing some of it away since it does not look good or spoils. this way i have control over it.
ReplyDeleteThanks for sharing your secret, Carmella. You always make everything simple & easy! :) I love the pics to help with the directions. I never knew I could keep the sprouts so long, either. I always tried to eat them within 3 days.
ReplyDeleteAlso, love the re-using of the mixed greens container!
Hi girls!
ReplyDeleteYou're both welcome! I,too, was never thrilled about store-bought sprouts. Not to mention that they've usually been on the shelves for a while and not so fresh at all. RVM, that probably explains you feeling that you had to eat them quickly.
Oh, and funny you should mention re-using the containers. We've got so many of these around here, we just HAD TO come up with creative ways to give them a second life. I find they're also awesome from freezing dehydrated goodies. I first put my burgers, cookies or whatever into ziplocs, then store them in the containers. Voila!
I need to sprout more often...I never make the quantities that you have here.
ReplyDeleteThanks for the great sprouting instructions. I was just thinking this week that I need to start sprouting. When I buy sprouts from the store, they usually start spoiling in 3-4 days and we also end up throwing about half of them away. They're too expensive for that! I had no idea that we could keep fresh ones for up to two weeks. Thanks again for a great and helpful post!
ReplyDeletePam
Thanks for the sprouting example!! You make it look so easy! I have really enjoyed reading your wonderful blog entries. Thank you so much for your inspiration!
ReplyDeleteLinda
Thank you so much for this information. I have really enjoyed reading your blog and I’m sure to come back in the future.
ReplyDeleteThank you so much for this info! I had no idea about the greening stage & have been eating my sprouts prematurely.
ReplyDeleteThanks!!